How to Configure Cisco Routers as Frame Relay Switch (FRS)?
Students and People who are preparing for the CCNA Exam often need to have a frame relay switch in their lab to practice for the Frame-Relay. How to configure Frame-Relay Switching on a Cisco Router? The following details and steps with topology diagram will explain the configuration.
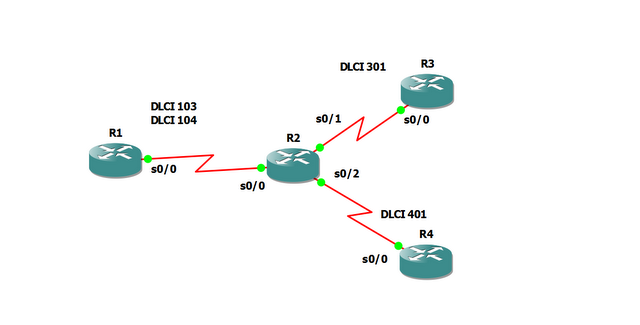
In the following example we will take four routers R1, R2, R3 and R4 . The Router R2 will be working as the Frame relay Switch. Now open the GNS3 Simulator and create the following topology with the help of four Routers.

NOTE: Remember to create topology using only serial cables because Frame-Relay is a WAN technology and works only on wan links. Now open the console of Router R2 and start configuring it for Frame-Relay with the commands given below.
R2>enable
R2#configure terminal
R2(config)#frame-relay switching
R2(config)#interface s0/0
R2(config-if)#no shutdown
R2(config-if)#no ip address
R2(config-if)#clock rate 56000
R2(config-if)#encapsulation frame-relay
R2(config-if)#frame-relay intf-type dce
R2(config-if)#frame-relay route 103 interface s0/1 301
R2(config-if)#frame-relay route 104 interface s0/2 401
R2(config-if)#interface s0/1
R2(config-if)#no shutdown
R2(config-if)#no ip address
R2(config-if)#clock rate 56000
R2(config-if)#encapsulation frame-relay
R2(config-if)#frame-relay intf-type dce
R2(config-if)#frame-relay route 301 interface s0/0 103
R2(config-if)#interface s0/2
R2(config-if)#no shutdown
R2(config-if)#no ip address
R2(config-if)#clock rate 56000
R2(config-if)#encapsulation frame-relay
R2(config-if)#frame-relay intf-type dce
R2(config-if)#frame-relay route 401 interface s0/0 104
R2(config-if)#exit
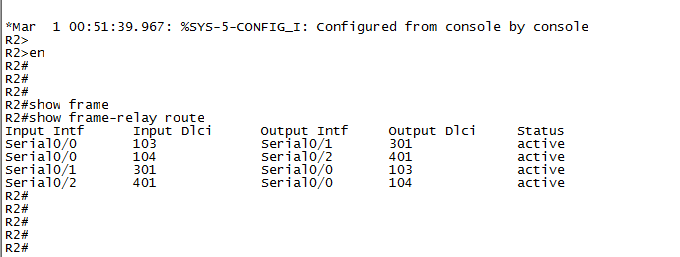
To confirm your FRS is working properly you can use the following command :
R2#show frame-relay route
